Welcome to the International Child Neurology Teaching Network (ICNTN) hosted by the ICNA. You would be joining a community of life long learners where learners from all over the world have access to the best lectures from the world's best tutors. The tutorials would consist of great video lectures accompanied by self assessment activities and other interactive features to ensure that learners understand the key concepts. The assessment activities though rigorous are meant to make learning accessible and enjoyable. The ICNTN project is about people and not profit.
The ICNTN hosts regular Webinar Series, online Work Shops, Case Discussions and an Online Certificate Course in Paediatric Neurology. The Phase I of the Online Certificate Course will be launching in Spring 2021 with the entire curriculum covered by 2022 Fall.
Speaker instructions for the ICNTN Webinar Series
Thank you for accepting our invitation to speak at an ICNTN Webinar Series, hosted by the International Child Neurology Association. You would have received an email as shown below.
System requirements
-
Browser: Chrome or Firefox (Up to date). Although our platform would work with the latest version of Chrome, Firefox, Safari, Edge, Internet Explorer 11 (if webcast mode is enabled) or Opera, we strongly recommend using Chrome or Firefox for the best possible experience. More information and download links can be found here.
-
Internet: Consistent, high-speed, 10Mbps+ click here to do a system check
-
Firewalls: None that block webinars
-
Video Apps: None open (e.g., Skype) - Please ensure all browser tabs except the one showing the webinar are closed.
On the day of presentation there are two ways you are able to present live.
(1) by sharing your application screen
(2) by preloading your "powerpoint presentation" as a PDF. If you select this option please email icntn@icnapedia.org and we will send you a dropbox link to upload the file to us either as a powerpoint or as a PDF.
ICNTN preferredUpload your presentation as a PDF or PPT(x). This will be converted to PDF.
However if your presentation has got lots of animations then you might want to choose option {tip title="Option 1" content="You share your application screen"}(1){/tip}. It is however considered good practice to avoid GIFs, automatic animations and complex transitions.
Preloaded Files Polls & Handouts
The Program Directors will arrange a Practice Session few days ahead of your lecture. Please let the organisers well ahead if there are any handouts you would like to provide to attendee of if there are any polls or any other messages that you would like to bring to the the attendees attention, before, during or after the webinar?
Multimedia
Any multimedia included in your presentation should be separately uploaded to the speaker platform. Please let the organisers have these files well ahead of the talk. Please make sure appropriate consent has been obtained in line with your employing or contracting body should be sought. Any multimedia file provided will be deleted following the event and where applicable images and videos will be anonymised before making the content available for view on demand.
Before your day of presentation the ICNTN Team will arrange a practice session for you to get familiar with the Webinar Platform.
Please also see the following sections for expert advice on positioning, audio, video and lighting requirements while presenting your webinar
Instructor instructions for the ICNTN Certificate in Paediatric Neurology Course
Thank you for agreeing to join the ICNTN Faculty. There are several steps involved in producing top quality content for the ICNTN. We have put togther detailed instructions to help you with this. The key steps involved in content creation is (1) Pre-Production (2) Production (3) Post-Production (4) Delivery.
Pre-Production
This is the planning step, and it’s the most important step when it comes to creating and delivering content in an efficient and timely manner to ICNTN. Pre-Production involves accessibility, content segmentation, scripting, storyboarding, scheduling, time budgeting and instructor coaching.
Before we explain any futher it is important to know how the ICNTN Course in Paediatric Neurology is organised, The entire course is comprised of several modules as outlined here. Each module has several Chapters which are further subdivided into several topics and sub-topics. Each topic/sub-topic content would comprise of video lectures with accompanying activities including self-assessment. The instructors would be typically responsible for creating these video lectures and assessment activities.
The first step is the creation of a content outline. The Instructor and his team should map out the Chapter content as a set of topics representing the overall structure of the chapter. This effort to create a content outline will help determine the number of topics, subtopics and units in their lecture. The lectures all together would constitute the Chapter content structure.
Please see https://icnapedia.org/icntn-curriculum/icntn-modules for a list of all modules and their codes
 Note: This is provided only as an example and not the complete course outline for the Movement Disorders module
 This outline will also help the Instructor and his team to identify how many video segments need to be created for each sub-topic. A good outline is invaluable, not simply for the video creation process, but for the development of your lecture as a whole. Each video segment should deal with a finite topic and should NEVER be more than 9 minutes long.
In case a "sub-topic" merits discussion on its own for e.g if in the Movement Disorders "Neuromodulation" sub-topic "Deep Brain Stimulation" could be dealt separately for learners to delve deep into that subject. However in that situation "Deep Brain Stimulation" should be treated as a separate "Topic" and would consist of several "sub-topics" involving multiple video segments.
Some instructors may be working on their own or together with their institutional team. In this case it is important for the instructor's team to work together with the institutional team to assure that the goals of each group of stakeholders are aligned. What does each group hope to gain from the development of the course? What does success look like to each of these stakeholders? Alignment on goals between all of those involved in the development of a lecture will better hone the effort and direction of course design in particular, the video production for your course.
The instructor and their course team should discuss the resources available for the course development process to make the most informed decisions you can about the direction of video production. The instructor may use their institution's video production department if those resources are available for them. If not the instructor would deliver the raw assets and accompanying resources including transcripts to the ICNTN Production team as explained later in this article.
Production
Production is the recording step when raw video and audio media assets are created. Production can take place using any recording device, whether it be a phone, a computer or multiple cameras at once. The content can be created DIY or by Standard Recording where a professional team is involved either provided by the institution or arranged by the instructor. We normally expect instructors to adopt the DIY approach. Please discuss with the ICNTN team if any resources are needed and we would endeavour to facilitate this.
Before you start recording video, it is important to take the time to think about the modularization of your lecture content. Your lecture's video content will be the sum of many different video segments. Each video segment presents its own production timeline with its own challenges. The topic videos are videos which help to teach the topic content. Topic content videos are thought of within the greater context of the course syllabus itself. Each of these videos needs to convey one segment of a greater scaffolding of information that, when combined with course content and assessments, builds the foundation of content for the modular course.
Your tutorial's video segments should be between six and nine minutes in length. Research on MOOC (Massive Open Online Courses) video watching indicates that videos that exceed six to nine minutes in length result in significantly lower retention rates1. Topics which take longer to teach should be split up into multiple video segments.
Many instructors may not feel initially comfortable modularizing their course content in the way described here. However, modularization is an important approach to consider for a number of important reasons. Generally, focusing individual video segments on coherent concepts makes it easier for the students to digest and comprehend that material. In the context of video production, segmentation adds real value and efficiency to the production and post-production steps.
This sample course outline shows how content is broken out into topics,sub-topics, units and assessments.
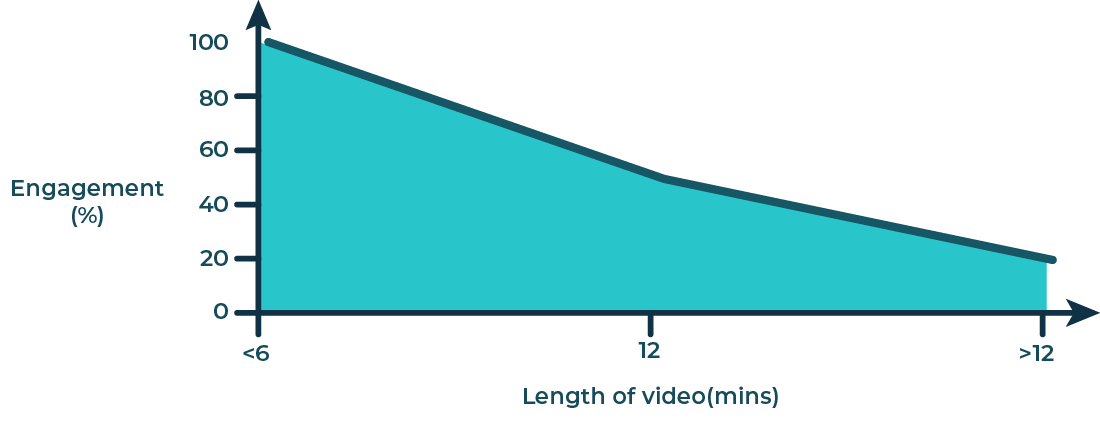 Graph representing the decrease in learner engagement as the length of video increases (approximate figures taken from Guo et al, 20141)
Scripting and storyboarding
Scripting and storyboarding are two important tools for crafting your lecture's video.
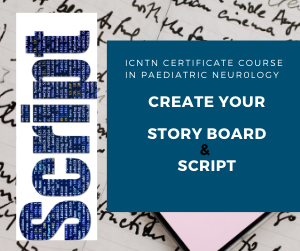 A single-spaced page of script in 12 point font will result in a video that's over two minutes long. Therefore, it's important to create a script that's no longer than half a page. It's also important to draw storyboards. Storyboards are a visual outline of content, and your script will help determine how many storyboards you'll need.
Scripting takes the guess-work out of creating video segments. and it also provides a concrete way to determine the scope of each video segment. Generally, each page of single spaced script results in about three to four minutes of edited video content. Scripts help course teams to pick the best recording modes for their script's content.
Scripting also gives video editors a document to work from when finishing the video segment in post production. In summary, the scripts are imperative for the efficient creation of video segments for an online course. Finally, a great way to cut back on time investment in video production, and stick closely to the delivery schedule, is to limit the number of allowed edit reviews and revisions.
The storyboards do not need to be beautiful pieces of artwork. Instead, storyboards have to succinctly convey the visual pacing of your video. Storyboards can also forecast how much third-party media you may need to complete your video. Scripting and storyboarding will enable you and your instruction team to properly plan for the recording and editing of your course's video.
Once a course outline, you can begin work on creating a time budget. Time budgets will help you and your team to determine the total time cost of producing video for your course. Your course's time budget will be influenced by a number of factors including, how many people are involved in each step of the video creation process, how you plan to record the instructor, the use or exclusion of scripts, and how many review steps you have for each video segment that's created.
As a guiding principle for budgeting time, the more hands involved at each stage, the higher the time cost associated with that stage. For instance, it can take less working hours for an instructor to record him or herself using a computer tablet and microphone than it takes for the same instructor to be filmed with multiple cameras by a camera crew.
Video segments could be followed by interactive assessments, knowledge checks, or discussion components to confirm students have understood the material covered in the video.
Powerpoint / Keynote Slide design guidelines
For the powerpoint presentation you will be required to use the ICNTN template available here. As we said before you may send us a video file of your talking head and the powerpoint presentation separately either as a powerpoint file or a PDF. Any multimedia included will have to be sent separately
There should be not more than 25 slides in total for a topic excluding the title, disclosure and learning objectives. The slide should be devoid of institutional branding. You should use the ICNTN template provided
Maximising Accessibility in Designing Your Presentation
Slide Layout and Template
Your presentation should have a consistent theme, with a simple background and high colour contrast. Keep your slides minimal and simple, with a descriptive title on each page that refers to the content.
Although colour can be a great tool to visually convey information, it can create accessibility barriers. When using colour, it is important to have sufficient contrast between the background and text colour (dark text on a light background, or vice versa). Strong contrast between text and background mean people with low vision can access the content more easily. You can see an example colour palette below.

If you would like to understand colour contrast further, you can download and run a Colour Contrast Analyser with your presentation. To make text more readable for colour-blind audiences, limit the use of reds and greens. If in doubt, we ask that you use one of these templates that Microsoft has identified as optimal for accessibility.
Large and Minimal Text
Please ensure that the fonts you use are easy to read, that the text is large and that any writing has a high colour contrast. Sans Serif is typically the most readable font (other examples are Arial, Calibri, Helvetica, Tahoma, Verandah). Be generous with spacing between letters, words and lines. Use bold for emphasis, rather than underline or italics. Use mixed case text rather than all caps. Text should be 18pt or larger. You can read more about font accessibility in this guide.
Provide Alternative Text and Image/Video Descriptions
Alternative text helps people who can’t see the screen to understand what’s important in images and other visuals. Briefly describe the images that appear in your presentation, conveying whatever information about the image is important. If you are playing a video in your presentation, describe what happens in the video. Read more about adding alternative text to visuals in Microsoft documents.
PowerPoint Checklist
♦ Good colour contrast with a consistent and clear template.
♦ Avoid cluttering slides with a lot of text.
♦ Do not use colour as the only way to convey information.
♦ Avoid GIFs, automatic animations and complex transitions.
♦ Give every slide a unique title and number your slides.
♦ Provide alternative text and image/video descriptions.
For further information, read this guide to making PowerPoint presentations accessible.
DIY Recording of your Lectures/ Tutorials
Good quality DIY recording can be done using a Computer, tablet/iPAD and an external microphone & screen recording software. If your video includes using a white board or drawings then you would also need appropriate software.
The simplest would be to present yourself on Zoom and record the content. However it would be difficult to meet ICNTN Video resolution requirements while using Zoom to record yourself. See Zoom1080p Video For H.323/SIP Devices . Alternately you could arrange with the ICNTN team a recording session on our webinar & meeting platform on Bigmarker, where 1080p resolution is possible. However if you are very familiar with Zoom and would rather use Zoom we have got some instructions here$
It is not mandatory to you use the programs we have suggested, i.e. Bigmarker (for recording) and Dropbox (for file transfer). You are welcome to use the program of your choice, but the guidelines and naming convention of your presentation and file remains.
You may either record yourself with the presentation on screen or provide us with a "talking head" video and your powerpoint file separately. If you are using an iPAD or tablet to prepare a Khan Academy style presentation you may provide us with the video file and the "talking head" video separately.
Software recommendations
Appropriate software is required for recording your screen if you are not using a webinar/meeting software
OBS Studio [Free, Open Source, Win/Mac/Linux]
Camtasia Recorder [Not Free, Win/Mac]
Apowersoft Screen Recorder [Win/Mac]
For drawings SketchBook [Win/Mac] [ You would also need an iPAD / Tablet and a stylus/Apple Pencil]. Applications such as Camtasia or iMovie provide powerful editing tools without a huge learning curve.
Hardware recommendations
Appropriate hardware selection is important
Webcam
Please make sure your webcam is capable of supporting 1080p resolution.
Some of our recommendations are
SANOXY 1280x720 Full HD 1080P
Logitech HD Pro Webcam C920
OKIOLABS OKIOCAM T USB Camera (for demonstrating something on the desk)
Of course you could also use an SLR camera if you have one. You may need separate software to make it work with your computer.
Microphone
Please do not rely on the computers or webcams inbuilt microphone for your recording. This is bound to disappoint. Please invest in a good quality external microphone. We would recommend the Spark Digital or Yeti series from Blue.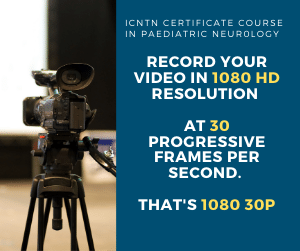 Camera
The ICNTN video player has a maximum resolution of 1080. This is a high definition format of video which represents 1,920 pixels wide by 1,080 pixels high. HD televisions have this same resolution. However, most learners will be playing back your videos in a much smaller resolution, because of the playback technologies available to them.
Their devices might be unable to stream high resolution video, and therefore might scale the video down to best work with their devices. This is called downconversion. When you're recording you should constantly consider what your video will look like in playback on smaller screens, especially when it comes to onscreen text.
ICNTN best practice is to shoot in 1080 HD resolution at 30 progressive frames per second. That's 1080 30p. When shooting on a PAL camera (outside of North America), please shoot in 1080 25p.
Your camera selection would also depend on whether (1) you are working in a large room or a small room? (2) you have any windows or no windows? (3) you have people walking around in the background? Or no people walking around in the background?
All of these questions influence your choices. If you are in a large room, you have the ability to zoom in on the instructor. This means you want to use a camera with a good zoom lens. Zoom lenses allow you to isolate focus on the instructor and to throw other elements of the shot into soft focus.
If you were in a small room, you'd want to make sure your camera has a good wide angle lens to capture everything in front of you. Some cameras allow you to throw backgrounds into soft focus even when using a wide angle lens. For more information, you can always consult the ICNTN team before you make any equipment purchases.
Learners have a difficult time reading small text on mobile devices. There are cameras which allow you to record in resolutions such as 4K and 8K. These resolutions are 4 times and 16 times the size of 1080 and therefore require much more hard drive space and processing power to use them. 4K and 8K require significant upgrades in your media storage and editing computers. Therefore, if you're using 4K or 8K cameras, we suggest you select a lower recording resolution within your camera, such as 1080 or 2K to facilitate easier raw media management.
In addition to appropriate hardware it is also important to take care of your location, audio and lighting.
Instructor Position, and Camera Framing
The instructor should wear solid-colored clothing on camera. They should avoid patterns including plaid, as well as colors such as white and orange-red. The instructor should also avoid wearing a scarf, as it can interfere with proper audio recording. While recording, the instructor should take breaks to drink some water.
The instructor should look directly at the camera lens and pretend they are talking to a student. This will help them to create a one-on-one connection with the learner. The instructor needs to lock their eyeline on a specific part of the lens. If the instructor's eyes drift this will look odd on the recorded footage. The instructor should speak in a conversational tone as if speaking to a single person, rather than giving a presentation to a crowd. The instructor should smile whenever possible. Smiling changes the tone of the instructor's voice and makes the instructor's overall demeanor more inviting.
You can read a script while having your voice recorded. Make sure to practice reading through the script out loud before recording. While speaking, pretend like you are having a one-way conversation with someone. Another suggestion is to always smile while reading your script. It will make you appear friendlier and will make your course content more inviting and approachable. If you are appearing on camera and have a script, you either need to: memorize your script (tough), use cue cards (not preferred) or use a teleprompter (preferred).
Height is an important characteristic of both camera and instructor position. And both positions directly influence the filming angle. Your choice of filming angle influences how the learner will perceive the instructor.
 It is ICNTN best practice to have the instructor positioned directly in front of the camera lens. And the lens pointed directly at the instructor's eyes. The instructor needs to look directly at the lens. The instructor should think of the camera as an ICNTN learner, and therefore should talk to the camera, instead of present to the camera.
If the instructor looks to the side of the camera, the learner will feel more detached from what the instructor is saying, and may therefore be more prone to lose interest. If the instructor feels insecure looking at a camera lens, you may want to consider adding a teleprompter in front of the camera lens. You could then either project on the teleprompter the text from a script, or a person's face. In either case, you need to make sure the instructor's eyeline is locked and not shifting.
The camera should be mounted on a proper tripod. This keeps the camera from vibrating too much and allows for manual operation of the camera. The tripod-mounted camera should also be positioned just above the instructor's eyeline and aimed slightly down. This keeps the camera from filming up the instructors nose.
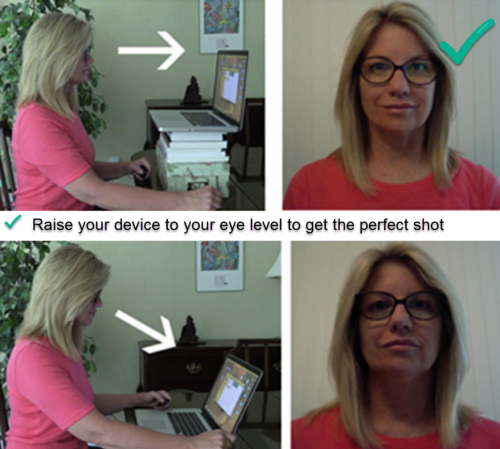
If you are using the camera on your computer, you may have to raise your device to your eye level, or better still even slightly above. If you need to, try stacking a few books underneath your camera set-up, or lowering your chair. Optimum ergonomic positioning will make you feel comfortable and relaxed. If the camera is slightly above your eyes you will lose any potential ‘double-chin’ or ‘up the nose’ shots. Choose a supportive small chair. Slouching on a couch or in a big armchair will make you look less polished. A low-backed chair that doesn't creak when you move is ideal.
Low camera angles are not flattering. This angle will distort your facial features and cast a shadow on your image; above all is not particularly comfortable.

Audio and lighting gear need to be positioned near the instructor. But they also need to not appear in your camera frame. Therefore it's important to double-check your camera framing to make sure you're not accidentally recording footage of your gear.
If there are windows in the room, you need to either use that light, or block that light, when thinking about how to frame your instructor. If there are people in the background, it is an ICNTN best practice to have those people in soft focus. So make sure that you're zooming in on the instructor. However, if those people in the background are making a lot of audible noise, you should pick a different location for your recording session.
When most people sit down in front of a webcam, they position themselves so their head is in the middle of the screen.
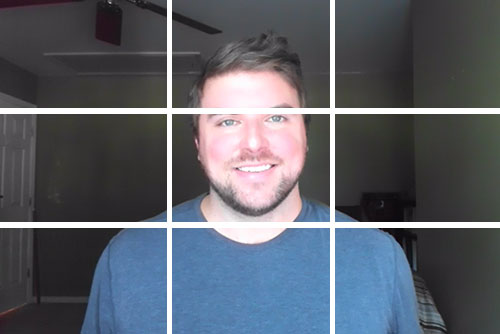 Head room is the space between the top of a subject's head and the top of the screen frame. If there is too much head room it gives a feeling that the subject is sinking and it make you look small. Too little head room will make you look like your head is stuck to the top of the screen.
The best way to get the right amount of head room is to imagine a grid laid over top of the screen – known as the golden ratio – following the principles of photography. Instead of placing your head in the centre square, align your eyes along that imaginary top third line of the grid. Make sure you can see your shoulders in the shot.
Location
The location you choose needs to be generally quiet, and resistant to penetration by external noises. Please listen carefully for a second and check whether you hear external noises for e.g street noises, such as car horns and sirens? Do you hear a lot of footsteps and talking in nearby spaces? Do you hear a lot of heater or air conditioning noises?
Although our brains have a remarkable ability to ignore noises such as these unfortunately microphones will pick up every single one of these sounds and embed it into your recording. If your recording has a lot of sounds penetrating your recording space your editing process will take much longer because your editors will need to work through removing these noises from the final video segments.
Please make sure you are able to schedule this location for your recording purposes until you're done with all of the recordings for your topic. Otherwise, you need to budget time for setup, recording, and removal for each individual recording session. These hours can add up quickly. Finally, if you're using any cameras, windows and room size can play huge roles in whether or not a particular space works for your recording sessions.
The bigger the room, the more options you'll have in positioning yourself and the recording equipment. If there are windows, light from these windows can either be a help or a detriment. If there's not enough power plugs scattered throughout the room, you may not have enough extension cords to properly set up lights and power equipment such as computers and monitors.
Sound
The audio is the most important thing to capture correctly. Please extra attention to the location (see below) and make sure the ambience is not too strong. Otherwise it will detract from audio recordings you make in that space. The instructor's voice can become buried or interrupted by loud ambient noises. When recording, eliminate all distractions, close the door and windows in your room. Shut off the TV down the hall. Silence your phone and disable email and other notifications on your computer and banish your pets too !
Your choice of microphones will also affect your audio recording outcome. Microphones come in all shapes and sizes, much like cameras. The three styles of microphone most typically used for video recordings are the shotgun microphone, and the lavalier microphone.
 The shotgun microphone attaches either to the camera itself, or to a long telescoping pole, known as a boom pole. The microphone attaches to the camera by a long cord which connects the microphone directly to the camera. Shotgun microphones are excellent at capturing a rich, full audio signal. However, the microphone's bulky size is difficult to hide. And the shotgun is excellent at picking up everything in a room, including ambience. The external microphone could also be positioned on a desk or attached to an arm fixed on the desk.
 The lavalier microphone is also known as a lapel microphone. The microphone looks like a small, black pearl, and connects to a long, thin audio cord, which can be comfortably worn under clothing. The microphone's head connects to the instructor's collar by a clip or pin and the microphone's cord stretches either all the way to the camera, or even better, connects to a small transmitter. That transmitter relays audio to a paired receiver, and that paired receiver feeds audio into the camera without ever being directly tethered to the lavalier microphone. The lavalier microphone captures more focused audio than the shotgun microphone. Since the lavalier microphone is able to hide under the instructor's collar it's the preferred choice for capturing instructor audio.
 However, if your camera has two isolated audio channels, you can record a shotgun microphone on to one audio channel and a lavalier microphone on to the other audio channel. This splitting of audio channels using different microphones is an ICNTN best practice. Finally, and most importantly, audio needs to be monitored as it is being recorded. If a camera operator is doing the recording then he/she needs to wear headphones and adjust audio recording levels accordingly.
Good audio will have
- no background noises or hums (usually comes from electronics, appliances, environmental noise, and mic setup issues)
- Little to no echo (usually comes from undampened hard surfaces in your recording space or from recording in too big a space)
- No distracting “popping” sounds on “p” and “t” sounds (not all voices and mics have this problem, but if you do, a pop filter helps)
- Adequate base volume that comes out of both headphone buds
Lighting
There are two forms of lighting, available lighting and supplemental lighting. Available lighting is the collection of lighting sources, you already have around you in your recording space. This includes the sun coming through a window, florescent ceiling lights or a combination of different available lighting sources from your recording space.
 Please pay extra attention to lightingSupplemental lighting is the collection of lights you bring in to the recording space. These lights are specific to filming and normally have a large degree of flexibility in terms of power and positioning. Some of these lights have stands, filters, and even barn doors to cut off light in particular directions.
Proper lighting for standard recording is a balance of using available lights and supplemental lights. Here are the primary things to consider when lighting your instructor. Lighting can vary greatly in terms of color temperature and power.
Color temperature is a measure of how cold or warm the light seems to your eye. The power of the light is a measure of how hard or soft the light seems on a particular subject, and more importantly how hard or soft shadows seem that appear behind the subject. For instance, the color temperature and power of sunlight varies greatly depending on the time of day. Sunlight is much warmer and softer near sunrise and sunset. These two times of day are known as “the magic hour” because they provide the best conditions for photography using just sunlight.
During the middle of the day, sunlight is much colder and harder, because the sun is at its apex. When the sun is at its apex, you can see the power of sunlight by how hard and dark the shadows are on the ground. To effectively use lights, you need a good camera which can capture the entire exposure range between dark and light. The goal of proper lighting and standard recording is to control the room's exposure range, and to showcase the things you want to showcase by positioning light sources appropriately.
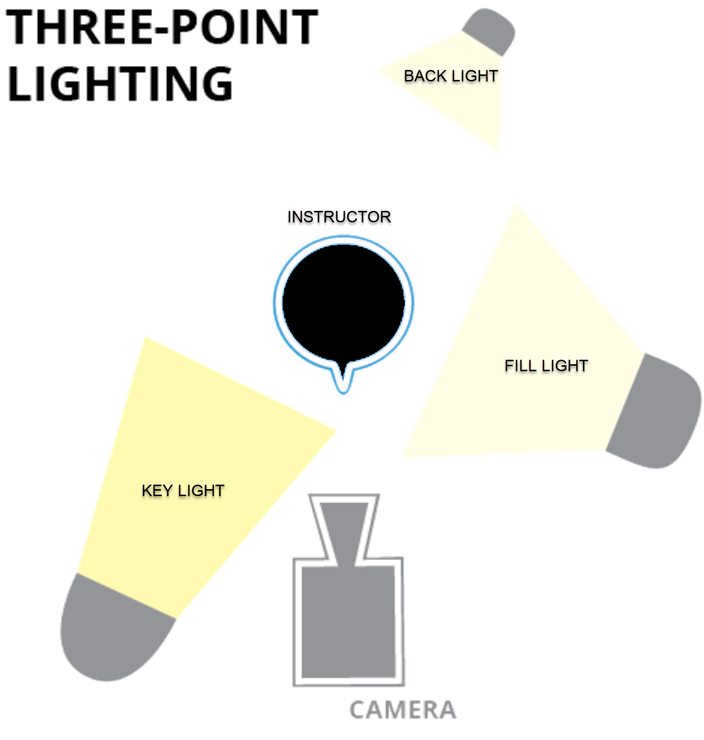 The easiest way to light your instructor is to use three-point lighting. Three-point lighting is the lighting from three separate sources which have the same color temperature. These sources are called the key light, the fill light and the back light. The key light is your most powerful lighting source and should provide the most direct illumination on your instructor, especially on his or her face. The fill light provides lesser illumination from the opposite side of the key light. The fill light helps to reduce the exposure range by eliminating hard shadows. The back light trains illumination on your instructor's back. The back light assists in separating the instructor from their background. The power of each lighting source is dictated by the light itself. and how far away the light is from the instructor.
The positioning of these three lights is extremely important. But it's even more important to identify the role of available lighting in illuminating your instructor. For instance, sunlight can act as your key light and if you bounce some of that light back, your fill light as well.
The problem with sunlight is that its power and direction is constantly changing from minute to minute. So you will need to constantly adjust your video camera's white balance and exposure settings to compensate. If you completely close off the sun from your room, you will be able to fully control the lighting within your recording space.
This is why closing window blinds is an ICNTN best practice. If you position your lights higher than your instructor, and also correctly position your camera in relation to the lights, you can eliminate hard shadows in your recordings. You can also use diffusion on your lights to make them softer light sources within the recording space.
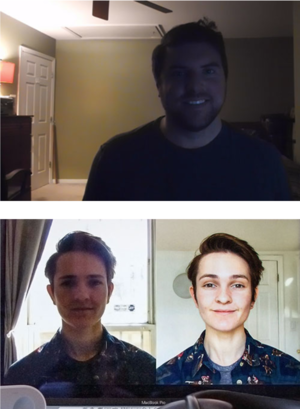
- If the light is brighter behind you, you will become back-lit and your face will be in shadow.
- If you set up with a bright light behind you the camera will see that big bright light and lower the exposure level overall to compensate. As a result, you'll end up looking like you’re in shadow.
- If possible, position yourself so you are facing a window to take advantage of the natural light coming in, or set up an additional light source in front of you to make sure you are well-lit. Your camera will detect the correct amount of light and will increase or reduce the exposure to produce an image that is not too bright and not too dark.
The background
- Now that you are set up, with adequate lighting and feeling comfortable, check your surroundings.
- More than any other tip, pay careful attention to your background is absolutely crucial. A a home office full of clutter or a kitchen table would be major distractions.
- The focus should be on you as the presenter, not what’s going on behind you, so keeping the background as simple and uncluttered as possible is important.
Delivering the lecture
Practice Practice Practice : Most instructors have little to no experience in front of a camera while being recorded professionally and for that reason it is very important that an instructor should practice their content delivery with other people before recording commences. Practice makes perfect. If the instructor is writing a script in advance of filming, it's important for him or her to get feedback. Writing a script is much different than writing in a typical academic setting. Another member of the course team should review scripts for clarity and consistency.
For instance, people can fill gaps in time with “you know,” “um” or a multitude of other verbal “connectors.” People may also fumble with their hair, mess around with their watch, or do things that are obvious on camera but less obvious when speaking to a crowd.
The instructor needs a good night's sleep before their recording session. Video recording can be a demanding and tiring process. On the day of the shoot, a number of other best practices will help keep the recording on track and successful. The instructor should wear solid-colored clothing on camera. They should avoid patterns including plaid, as well as colors such as white and orange-red.
The instructor should also avoid wearing a scarf, as it can interfere with proper audio recording. While recording, the instructor should take breaks to drink some water. It's easy to hear when someone is dehydrated on an audio recording because their mouth will make a lot of smacking and clicking noises as they speak.
The instructor should look directly at the camera lens and pretend they are talking to a student. This will help them to create a one-on-one connection with the learner. The instructor needs to lock their eyeline on a specific part of the lens. If the instructor's eyes drift this will look odd on the recorded footage. The instructor should speak in a conversational tone as if speaking to a single person, rather than giving a presentation to a crowd. The instructor should smile whenever possible. Smiling changes the tone of the instructor's voice and makes the instructor's overall demeanor more inviting.
Being recorded is a very unnatural act, especially if you are tasked with speaking directly to a camera. Please be upfront with the personnel or the ICNTN Team who are filming with you. They will appreciate where you are coming from and can help make your entire recording session a lot easier.
Slow it Down
We tend to speak faster than usual when presenting. When preparing and presenting, keep pacing at the forefront of your mind and avoid writing a presentation that you need to rush. We suggest somewhere between 120 – 150 words per minute. Speaking slowly and clearly will help with automatic closed captions and ensure everyone can keep up with your content. Try to use plain language and avoid the use of acronyms, complex metaphors and jargon.
Describe What You’re Showing and Flag Who is Speaking
It is fine to use visual information in your presentations, but you should be prepared to describe what is happening on your screen.
The platform will be showing your slides at the same time as your presentation, so that viewers will see what you are discussing in real-time, visually.
Make a test recording
Make sure you check your equipment by creating a test recording. A test recording can keep you from wasting time with malfunctioning equipment. When recording, monitor your audio and video levels. Use headphones. When recording, do test playbacks from the raw media while you're still actively recording.
If anything is going wrong in your recording, it's better to adjust earlier than later. After recording, always back up your raw media. There's nothing worse than accidentally deleting a video without a backup version. When editing, use naming conventions and stick with them. It sometimes helps to give segments codes instead of titles.
If you use titles, make sure to organize them so that they'll be easily sortable. Finally for delivery, you would upload the video segments and transcripts including any other resources to ICNTN. Your production assistant from the ICNTN team will guide you through this.
A good video will be
- In HD, 1080p with 16:9 aspect ratio
- Clear, not blurry, so learners can see you and your learning material easily
- Steady, not shaky Well-framed and zoomed-in appropriately so learners can easily follow along with what’s on screen
- Well-lit and free of distractions in the video frame, and present yourself in a friendly and professional light
A good delivery quality will be
- Straightforward speaking style with very few “umms” and “ahhs”
- Enthusiastic and energetic tone of voice.
- Clear pronunciation of words and use of pauses to emphasize important points
Prepare your schedule well in advance
An e.g of a proposed timeline
- 1 Month - Course outline and Draft Scripts Completed
- 3 Months - Complete filming and develop additional course components (Questions and Text)
- 4 Months - Complete full course and QA the course”
Structured Reflection
Following each video segment, the instructor should incorporate some structured reflection. For e.g the instructor may add “knowledge checks” to pause and reflect while key concepts are reinforced. This will allow learners an opportunity to make sure that they have retained the important information from the video before moving on. Remember that reflection aids retention.
It is important to provide supplemental text summaries of reference information to alleviate potential learner frustration. Some students prefer learning from reading text than from watching videos. Use video with visuals: Simple graphics or diagrams can often help convey information better than any video could. Interactive exercises or assignments can also help students to gain knowledge as they apply information within a contextualized environment.
Although video is the fastest way to convey lots of information efficiently to a learner it can also be the most time-inefficient tool depending on the information you want to convey. Video takes much longer to create than text and graphics, and sometimes is not as effective a tool as interactive exercises at helping students gain knowledge in your course’s subject matter. Please note that the Classroom Exception of Fair Use does not exist online. Release forms and third-party media licenses are mandatory if you are using third party resources.
If you are authoring a complete interactive course along with videos and assessments yourself you may do so. However it will have to be SCORM compliant. Our recommended software for this are ispring suite , Articulate 360 and Adobe Captivate. If you are intending to use a software other than these please check with the ICNTN Team to ensure their compatibility
A complete lecture will have
At least 30 minutes of video content consisting of multiple video segments of no more than 9 minutes each
At least 3- 5 separate lectures on various sub-topics
HD video quality (1080p)
Audio that comes out of both channels and is synced to video
Audio quality that is not distracting to students
The Learning Experience
Each Course Module has clear learning outcomes & objectives and comprises of several chapters with clearly identified topics and sub-topics. Each topic will have one or more lectures with individual clearly definied learning goals, with all lectures building to reach that topics subgoals.
The lecture formats may vary from topic to topic. Too much screencast or talking head can become tedious. Choose your lecture format based on the material you are teaching. The lecturer should provide all needed resources including downloads, and reference links. The lecturers will also prepare or contribute to the learning activities.
Each topic lecture will consist of a video based master class, a selection of curated key learning resources and a self assessment activity. Note that a video can contain multiple production styles
- Slides - PowerPoint /KeyNote slide presentation with voice-over and a "talking head"
- Full-screen video of an instructor drawing freehand on a digital tablet, which is a style popularized by Khan Academy videos
- Classroom video captured from a live classroom lecture
- Studio – instructor recorded in a studio with no audience by a second party. This second party is responsible for all physical aspects of recording the instructor, and is in turn responsible for setting up and using the camera, audio and lighting on each shoot. The other person is also responsible for media management after the shoot is complete. If your recording were a newscast, the instructor would be the news anchor and the other party would be the camera operator
- Office Desk - lose-up shots of an instructor’s head filmed at an office desk
Transferring your content to ICNTN
This is the step when you upload your final video segments and transcripts to ICNTN along with your instructor biography. Keep your Bio short, to the point, and relevant to your expertise. provide important links. Links to your social profile on ICNApedia will be automatically added and will be accessible depending on your privacy settings.
The video files that you create may have to be compressed before being sent to the ICNTN team. Of course this is not applicable if the ICNTN team is facilitating your recording. For ICNTN purposes, you need to compress your videos using “H.264.” Typically you export at the same frame rate that was used when you created the media file.
For example, if you create the file in a country that uses the PAL system, you export at 25 fps instead of the NTSC standard of 29.97 fps. By using these H.264 specifications, you will be shrinking your files sizes by a factor of 10 to 20 times. To systematize this encoding process, video files can be handled in batches by video encoding software built into your Non-Linear Editing, or NLE, system. You can also use third-party video encoding software such as MPEG Streamclip to batch-encode your files. If you are using a third party software like Camtasia Recorder you would be able to select settings to export it to YouTube etc. After you have encoded your videos via H.264, the next step is to deliver your content to ICNTN which the ICNTN team will facilitate.
| Codec |
H.264 .mp4 |
| Resolution & Frame Rate |
1920x1080, progressive, 29.97 fps Typically, you export at the same frame rate that was used when you created the media file. For example, if you create the file in a country that uses the PAL system, you export at 25 fps instead of the NTSC standard of 29.97 fps. |
| Aspect |
1.0 |
| Bit Rate | VBR, 2 pass |
| Target VBR | 5 mbps |
| Max VBR | 6 mbps |
| Audio |
{tip title="AAC" content="Advanced audio coding (AAC) is an audio coding standard for digital audio compression. AAC is the standard format for YouTube." class="blue"}AAC 44.1 / 192 kbps{/tip} |
File naming conventions
To facilitate identifying and tracking video files, we strongly recommend that you use a naming convention for all video files in your lectures. At a minimum, your naming convention should include these elements.
{module number}{year}{topic no}{subtopic no}{unit}_{version}.{type}
For e.g the above convention would yield a file named 109_2021_1_10_1_v2.mp4
Post-Production
This is the editing step and is normally undertaken by the ICNTN Production Team. During Post-Production, the raw media you recorded during Production is crafted into individual video segments. This step takes the most time, but can be managed if you have used your Pre-Production phase correctly. If you are doing the post-production yourself or via the institutio , the ICNTN Production Team will instruct you on the use of graphics, animations and third-party media in your video segment, as well as the use of color correction and audio mixing to refine your video.
Accessibility
When designing your content, it is important to make sure its accessibility for all learners on all devices. The ICNTN Course team will ensure a set of international accessibility guidelines known as WCAG 2.0 are satisfied. WCAG stands for “Web Content Accessibility Guidelines” and 2.0 is the latest version of these guidelines available here. It is extremely difficult and expensive to add accessibility later once the video has been recorded.
For Audio-only and Video only (Pre-recorded) please make sure the video and audio tracks hold duplicative information. This will allow learners with a visual or hearing deficiency to access the educational content without having to rely on both tracks simultaneously. The gestures and actions of the instructor need additional context, so instructors should talk through what they are doing at all times and be explicit about what they are interacting with.
If your video contains a lot of visual content that is not described in the audio channel, then you will need to generate a separate audio output which contains audio descriptions of actions on-screen.
It is important to not use color as the only means of conveying a piece of information within a video segment to help learners who may be suffering from a colour perception deficit.
To satisfy minimum requirements on "contrast" your video content needs to have a contrast ratio of 4.5 to 1. This means that the luminance of the brightest part of the screen needs to be 4.5 times greater than the darkest part of the screen. There are free tools on Windows and Macintosh computers which can analyze contrast ratios for you. Here is a link to these tools.
Please also see the accessibility guidelines for your presentation slides described earlier.
Captioning
All content on the ICNTN Course will be transcribed and/or captioned. Captions would contain additional descriptive information beyond simple transcripts. The ICNTN production team will attach caption files to your video segments. You may provide caption files with your recording if you or your institute have your own captioning vendor. Our preferred vendor is 3Play If you are providing your own captioning please make sure to allow enough time in Post-Production to review your captions for accuracy.
If you don't have time to create your own graphics or animations, the use of third-party media is an excellent option for improving your video segments. It's important to understand that third-party media usage is not covered under the classroom exemption clause of fair use. Your institution needs to license third-party media before it is used in your course.
Fair Use is only recognized in the United States. Your video segments will be available to a worldwide audience on the Internet, meaning unauthorized use of third-party media can be considered piracy. For more information please contact the ICNTN Program Directors.
It's important to license use of third-party media before you put it into your video segment. There are many ways to do so. You can get permission directly from the copyright holder, or you can procure the media from a royalty free media market place. We have provided some links to marketplaces for you below. Normally, these marketplaces provide free screener copies of media such as stock footage, stock photos, music, animations and sound effects. You can shop around and download screeners to add to your draft edit. When you are ready to finalize your video, you can purchase a license and download master quality copies of the media.
Please contact icntn@icnapedia.org with any questions or concerns.
1. How video production affects student engagement: an empirical study of MOOC videos https://dl.acm.org/doi/10.1145/2556325.2566239
2. Williams, J. R. Guidelines for the use of multimedia in instruction. Proceedings of the Human Factors and Ergonomics Society Annual Meeting 42, 20 (1998), 1447–1451.
$Courtesy: European Society of Radiology